Tin Biomass
Spray Gun – How To Use It In Properly Way For Fresher
I. What is a Spray Gun and How Many Types Are There?:
Spray gun are commonly used in environments that require uniform and consistent application, especially for large projects or in industries producing interior and exterior furniture that demand high consistency. Although paint sprayers are also used at home, they still require a high level of understanding and skill. Despite being quite prevalent in the painting industry, many people still find it challenging to use them. This is because they require the operator to have advanced skills and the ability to control the spraying system appropriately. From selecting the sprayer, adjusting the paint, to the painting technique itself, everything must be done meticulously. Therefore, Biochem will explore and address all the questions and concerns regarding paint sprayer for beginners.
Table of Contents
A/ Spray Gun Structure
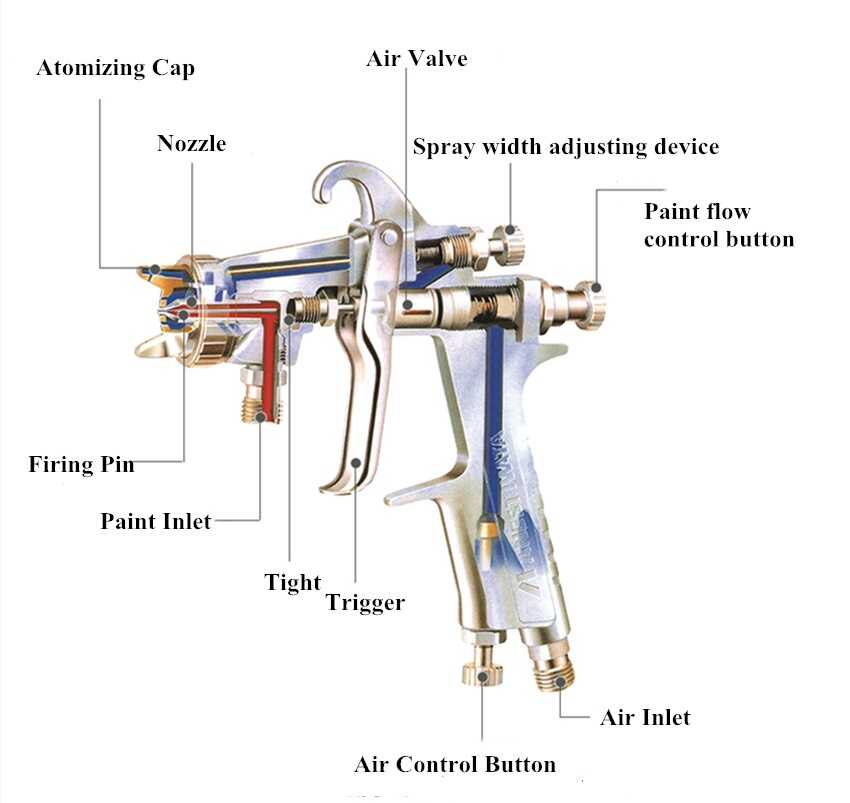
A spray gun is composed of 14 individual parts. Depending on the type of gun, the components may vary in number and configuration based on the intended use. For painters, there are four key areas that are most important for adjusting the paint:
1. Air Control Button:
The air adjustment knob is located at the tail of the gun, on the left side near the air hose connection. This knob controls the air pressure that pushes the paint out of the nozzle, preventing leaks or backflow into the gun body. Adjusting the air also affects the size of the paint particles and the smoothness of the paint layer.
2. Paint Flow Control Button:
This is the second largest knob on the gun body, located below the air adjustment knob. It regulates the amount of paint released from the gun, preventing excessive paint that can cause runs or insufficient paint that can result in an uneven finish. To achieve the best results, adjust the air pressure to match the paint flow, avoiding too much paint with insufficient air, which can cause drips and uneven spray patterns.
3. Spray Width Adjustment Button:
The smallest knob on the gun body, located behind the nozzle, allows for the adjustment of the spray pattern width. For larger surface areas, a wider spray pattern should be used.
4. Atomizing Cap:
The needle cap is at the front of the spray gun. It adjusts the direction of the spray horizontally or vertically. For vertical surfaces like wooden planks, adjust the cap vertically to ensure even up-and-down strokes. Conversely, for horizontal surfaces, adjust the cap horizontally to spray left to right evenly.
B/Types of Spray Guns – Diverse Functions for Various Needs
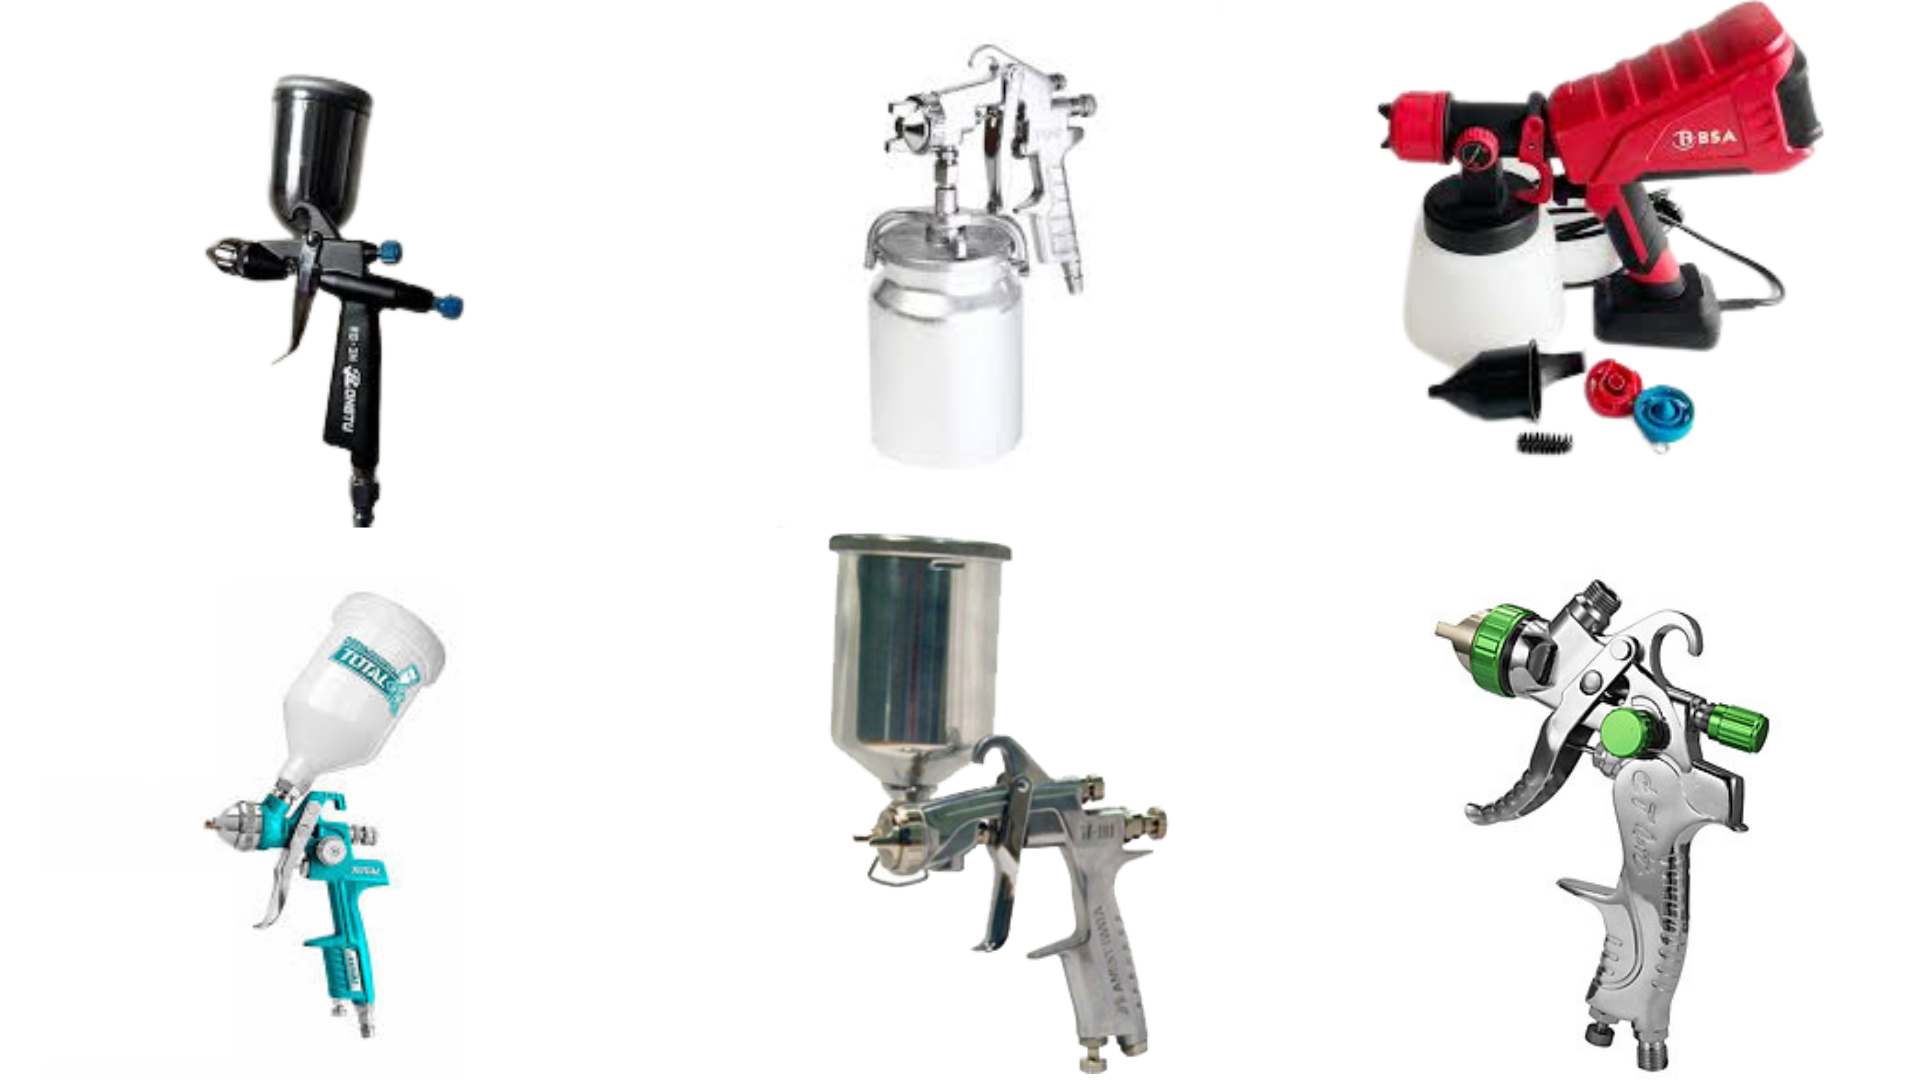
There are six main types of spray guns available on the market:
1. Air Spray Gun:These guns use compressed air to spray paint and are the most common type used in large production workshops. They are suitable for projects that require a smooth and even coat, such as automotive interiors. However, air spray guns require a significant initial investment. In return, they provide a smooth, even, and beautiful paint finish.
2. Electric Spray Gun:These guns operate using electricity and do not require an air compressor. They are suitable for small to medium-sized jobs and are easy to use at home. Electric spray guns are user-friendly and budget-friendly, making them accessible for home users.
3. HVLP (High Volume Low Pressure) Spray Gun:These guns use low pressure and a high volume of air to spray paint, reducing paint mist. HVLP spray guns are ideal for jobs that need to save paint and reduce environmental pollution. They also produce a smooth paint finish. Although HVLP guns require a higher initial investment compared to other types, they are a worthwhile investment for increasing painting efficiency and saving long-term costs.
4. LVLP (Low Volume Low Pressure) Spray Gun:
These guns use low air volume and low pressure, similar to HVLP, but are more economical. LVLP spray guns are ideal for tasks that require high precision, such as premium interior finishes. They are also highly suitable for wide surfaces.
5. Automatic Spray Gun:
Automatic spray guns are commonly used in mass production lines that require high uniformity. They can be easily programmed according to set standards, making them suitable for industrial production and large-scale manufacturing.
6. Airless Spray Gun:
These guns do not use compressed air but instead spray paint by pumping high-pressure paint through a nozzle. They require spacious environments to accommodate the pressure pumping system. Airless spray guns are ideal for large surfaces such as walls and wood coatings.
II. Proper spraying technique
1. Prepare the Spray Gun:
Identify the appropriate type of spray gun for the job as outlined in part 1. Next, prepare the wood surface by sanding and cleaning off any dust. The surface should also be dry before you begin painting. Mix the paint according to the manufacturer’s recommended ratio. Make sure to check all the components of the spray gun, such as the paint container, air hose, air filter, and pressure regulator, thoroughly. Each component plays a crucial role in ensuring that the paint is applied evenly and beautifully.

3. Clean the Spray Gun Thoroughly for Future Use:
After completing the painting process or switching to a new type of paint, it is essential to clean the spray gun. Use specialized solvents such as gasoline, alcohol, or other recommended solvents. First, pour the solvent into the paint container, close the lid, shake gently, and wipe dry with a dedicated cleaning cloth. Next, test the spray to ensure the flow is even and that there are no blockages. If everything is clear, proceed with the next steps in the painting process or store the equipment for future use.
4. Store the Equipment Properly for Longevity:
To extend the lifespan of your spray gun, proper storage is necessary. First, empty all paint from the gun, pour any excess paint into a separate container, and seal it tightly. Dispose of or handle any hardened paint according to the manufacturer’s recommendations. Then, clean the spray nozzle and needles with a small brush or needle. Wipe the entire gun and accessories with a specialized solvent.
Store the gun in a dry place. Place it in a box or dedicated cabinet to protect it from dust and other contaminants. For moving parts, use specialized oil for lubrication. Regularly inspect the equipment to detect any damage promptly. Additionally, carefully check all connections with other equipment.

III. Tips To Utilize Efficiency of Paint Spraying Tools
- Practice on a test surface before starting actual work to familiarize yourself with the spraying equipment. It’s essential to control the spray properly because uncontrolled spray patterns can lead to uneven coverage on the surface. Additionally, adjust the spray angle, nozzle air pressure, and spray pattern. Practice hand movements, such as wrist flicks, to ensure even paint strokes.
- The working environment is crucial, especially during spraying. Ensure that the spraying area is well-ventilated. Avoid placing the gun too close to your face or eyes, as this could cause health issues.
- Always wear protective gear such as gloves, masks, and safety glasses to safeguard yourself during the process. Health is paramount.
- Read the manufacturer’s recommendations carefully to improve painting performance and extend the lifespan of the spray gun.
- Use solvents to clean the gun. Also, ensure proper storage of the spray gun and perform regular checks to detect any damage as early as possible.
 Tips how to spray paint in asthetic way.
IV/ Conclusion
We hope these guidelines will help you use the equipment correctly and effectively! Understanding the structure of the equipment you’re using is crucial, as it allows you to control the quality of the product. Not only professionals but also DIY enthusiasts at home can easily grasp the basics to save on costs. The above information covers everything you need to know about spray guns. If you have any questions or need advice on safe, new-generation, water-based wood paints that are durable, low-odor, and low-dust, don’t hesitate to contact us.
💚Biomass – A part of Biochem – For the health of every Vietnam Family💚
📍 Address: 66 Stress No 1, Block 1,Tan Phong Ward, District 7, Hochiminh City.
📞 Tel: (+84-28) 3620 4207 | 3620 4208
📠 Fax: (+84-28) 3620 4206
🌐 Website Biochem: www.biochem.vn
🌐 Website Biomass: www.biomasscoating.com
📧 Email: contacts@biomasscoating.com
